

Mike.K
-
Content Count
204 -
Joined
-
Last visited
-
Days Won
39


-
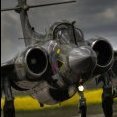
Having rebuilt a rare Ramair Ultimate (Red and white colour scheme) recently, the yearn for a Seagull version still pulled hard. The chances of obtaining the now discontinued Seagull rendition though was pretty slim. I`d despaired of ever finding such a kit, either as a built and may be used example or as a new un-built kit. It`s been about five years since Seagull took the Ultimate out of production and I`d almost given up of ever obtaining one. A chance phone call to Rob at Avicraft suddenly and quite unexpectedly produced a chap in Selsdon with an unflown Seagull Ultimate that was for
-
Two weeks or so after my last progress report, the Ultimate is receiving the final fettles. Only the Rx aerials to locate now and a bracket to manufacture for the steerable tail wheel shock springs. The C of G was checked out at Avicraft yesterday having taken dimensions from the airframe and passing them through proprietor, Rob Newmans favoured online calculator. C of G positioning is currently at the forward end of the suggested limits and broadly equates to the position suggested by Seagull for their very slightly larger but very similar 54" version of the Ultimate. The weight of the m
-
The Ultimate overhaul continues to progress well. The new paint has now dried but has flattened slightly with further curing. That will polish back up to a reasonable lustra. For those interested, the spats came from one of my crashed Ultra Sticks......lightly flatted, primed and repainted in two pack red paint, they have been married to a gashbox scrap carbon fibre landing gear which has again been painted in two pack red paint. The addition of the light weight spats together with some slightly larger and softer wheels certainly adds a bit of bling to the model as well as hopefully reduc
-
The Ultimate Bipe strip and rebuild continues at a good pace. Nothing unexpected or of any consiquence. Some control surface hinges displaced during covering removal.....ie, they just pulled out due to a slight lack of CA adhesive during the original build of the model! I don`t mind that...its better than them coming off now rather than during the early recommissioning flights. CA adhesive will fix the issue during the re-build. All the old covering has been removed from the model and the end result just needs some minor sanding, dusting off before being ready for a recover in HK material.
-
Anyone having read my Cermark " Rothmans Pitts Special thread will perhaps realise how much effort went into modification and referbishment of this rare and lovely model. Having put heart and soul into the project, I`m perhaps a little reluctant to fly the model without getting some advanced flying practice in place prior to commiting to flight. I estimate that I`ve put around five hundred hours of re-build time into this model. I`m in no hurry to fly the beast without making sure I`m up to the task. It is probably true to say that even the most experienced model pilots around would baulk
-
For those wishing to see my plan for getting myself up to speed for flying this gem of a Pitts, they should visit my thread in the Scale Section entitled " Ramair 50" Ultimate Bipe........the lead up to flying my Pitts Special". The thread describes the aquisition of the Ultimate airframe shown in the image below together with its strip down, modification and rebuild to afford me suitable fast bi-plane flying experience. Plenty of large images support the story. Mike
-
The Pitts is now 99% complete. Just the windshield to screw into place tomorrow once its surround paint has dried. Today saw the rigging wires fitted and tensioned...an ongoing job as rigging wire has a horrible propensity to slacken until it stretches out after several retension sessions. The most tedious part of this job was laboriously painting those flying wires with white fuel proof Guild paint using a small paint brush. The effort was well worth expending as the painted flying wires add a degree of interest and gravitas to the model. Left in the supplied bare stain less steel config
-
Two days after I started this thread, further work has been done to the Pitts. Rigging hard point plates have laboriously been cut and fettled from 0.5mm ali sheet. Eight are required in order that the model will look the part. A Pitts without rigging would appear to be missing a vital part of its character. Making these parts is certainly tedious but vital to achieve the right effect. My last work action this evening was to bolt the hardpoint mounting points onto the model. Rigging wire fitting begins tomorrow. The cowl, ali spinner and wheel spats have been sprayed and the masking
-
Only recently did I discover how difficult it was to source a ply and balsa 60" span RC Pitts Special kit either as a self build wood kit or as a pre-covered ARTF. I`m not interested in small cheap, budget disposable junk models. I`m a long term true aero modeller rather than a short lived plastic toy plane operator. Hobby King or FMS foamies are not for me. Although Blackhorse show their Pitts Special BH85A ARTF kit on their Vietnamese site, not one UK agent has one in stock. The same situation at European outlets. Priced at a whopping £588, this airframe only Pitts kit certainly isn`t a
-
As a mental relaxation break from building my second scratch build, Rothmans colour schemed Stampe, dispersal of another £350 to our Rob at Avicraft landed me a 80"/2032mm Seagull ARTF Chipmunk kit resplendant in the bright Cub Yellow colour of Royal Canadian Air Force ab initio livery. Great for dull days or at flying sites which have tall green tree surroundings. Models can tend to disappear on landing finals against such backgrounds and I`ve taken to putting yellow strips on leading edges of many of my other models to overcome the issue. This Chipmunk goes one better...its all bright yellow
-
With my first Stampe build complete, it`s time for a second one! Using the same French Bulconcept plan used with a short kit sourced from Guix Model, I decided to produce my own kit of reproduction parts and save the rather high cost of importing a second Guix kit. Before building the Guix Model kit, I pen traced around all the parts onto appropriately sized core balsa and ply stock. I produced two reproduction kits for future use once I`d finished the first Stampe. The future has indeed arrived with the first Stampe being ready to fly. I`ve today started to build from one of my repr
-
Just a day after finishing this Stampe and clearing the decks of all the building detrietus, another Stampe build has been started! This second model will be a rendition of one of the 1970`s Rothmans sponsored aerobatic team aircraft seen so reguarly at airshows of the time. I carefully copied the parts used to construct my model of G-AWEF prior to commencement of this second construction. Two balsa and ply kits were pen marked onto a stack of raw sheet material and then set to one side to await a build once G-AWEF had been completed. I retain one of those copy kits with fellow Croydon me
-
Between the monsoons, I took the Stampe outside for a photo session. It looks much more at home in an open air environment. The colours really start to pop under natural light. Here are some further images then of the Stampe in the open air. Emma pinged me to show me here latest Tiger Club motifs. A huge improvement on the experimental water slide transfers. Thanks again, Em! I`ll add further images once the model gets to the flying field. Mike
-
I see my last post about the Stampe was on 9th April 2021. Following that I took some time out from this model as I experienced "engineers brain drain" and found it increasingly difficult to concentrate on the mass of small and intracate details needed to bring the model to completion. The answer was to rest the grey cells on a simple and straight forward ARTF referbishment project. Rob sold me a large but sound, albeit rather tired Pacific Aeromodel Gee Bee Sportster. That took a couple of gentle weeks attention before that was ready to fly and I was ready to continue with the Stampe. Wi
-
I got "Robbed" again...... Robs ceiling collection of used models always holds an attraction for me. Once again a glance to the ceiling at Avicraft proved too much for me. A big red and white 82" Gee Bee caught my eye. Battered,dirty and generally of down at heal appearance, the model had obviously seen significant battle action during its flying career. A date stamp on a wing root suggests this model was manufactured in 2002. Rob told me this model although big, was light enough to be allowed to be permitted to fly within our local FRZ restrictions. The model required a four stroke 180 s