

Spiffy
-
Content Count
68 -
Joined
-
Last visited
-
Days Won
1
Content Type
Profiles
Forums
Downloads
Store
Gallery
Calendar
Posts posted by Spiffy
-
-
My preference is for 19mm blockboard so it is stable and flat. If space allows go for something like 8ft x3ft and finish the ends off with spruce strip mitred at the corners this adds more stability to the board. My board is on two metal fold away trestles and it has served me well over many years of building. I usually use dressmakers pins about 2" long and home made balsa right angles for jigging the model. I use an offcut piece approx 2ft x1ft and this is for tailplanes and small sub assemblies which is handy because you can move it around from room to room if you are that way inclined .
Cheers
Pete
My previous board was blockboard similarly, with hardwood edgings glued and screwed to stop it warping. Served me many years, but left behind on my move. Large Plasterboard sheet is a good temporary solution for big projects, it takes pins easily and laid over a bench is nice and flat (fairly cheap too!!)
0 -
I have my combat wing ready to go, the only thing is that I might have to work

Well leave your wing and I will fly it on your behalf

Snork! Well I'm moving house so unlikely to be there, I'm behind with the packing, so it's panic stations else I won't be ready in time for the Monday, plus sod's law, hurt my back again, which doesn't help.
0 -
After my contretemps with my Z26 engined YT Edge a few weeks back landing just short of the patch and breaking off the nose (the under-carriage remained attached so it tipped the nose in hard), it's all back together looking almost good as new, mostly it was just a lot of the glue joints let go round the nose area behind the cowl, plus a couple of stringers broke, so structure was re-glued back into place, a small bit of ply to repair one former that cracked and stringers repaired in just a couple hours work.
Couldn't match the pro-film covering exactly but looks presentable.
Looked worse than it actually was, now all is needed is the engine to be set up again (it was not picking up from idle properly which is why it died short on finals).
0 -
Looking Excellent, Don. You are an "artiste". Wish I had the time to carry on building my old Dragon Airliner (and repairing existing aircraft) but everything is at a standstill till I get my house on the market and move (Decorating, clearing junk etc)!
 0
0 -
Nice - I've had a half completed Dragon up in the loft for years. Never got round to finishing it. Interesting to see how it flies with leccy power.
0 -
It's usual on a twin to have out thrust on each engine to compensate for asymmetric thrust if an engine goes out, plus a big fin/rudder area.
With electric it don't matter very much as both should be running equally. so with electric no problem.
0 -
YT Edge 540
in ARTF
Notice they are charging a tenner on top for the delivery on that other forum - Got mine for the basic price of 165 inclusive. Still a bargain. Maybe you could twist Wilson's arm (at YT) a bit Darren -they want to dispose of their older stock, so they may waive delivery charges.
0 -
YT Edge 540
in ARTF
For those that have seen my Edge (with 26 Zenoah) YT have a couple left at the bargain price of £165.00 which is a lot cheaper than the original RRP.
They are the end of the production run, as new versions of all their warbirds etc will be moulded composite fuselages, so once gone that will be the last of these. Suits 26cc 2 stroke Glow or Petrol engines. Contact YT International direct if any one is interested in one.
It's a very stable aircraft.
0 -
Auster AOP9
in Scale
Well I "assume" the Auster is still there, but didn't see it on my last visit to Duxford, but then I wasn't looking for it, and they have re-arranged the exhibits with a new hanger to play with. The Army Air Corps have one in their historic display team I think.
I've flown in one very many many years ago as a passenger, it was very drafty to say the least and rattled like a tin can, and I didn't feel at all safe, probably because of all the perspex around. Good vision all round though

 0
0 -
Auster AOP9
in Scale
Well they "were" all Military (until demobbed) as they were used for Air Observation aircraft hence the designation so I guess a camouflage version would be the correct choice, unless you fancy a civilian repainted one.
Lots of photos around on the Net for them, and quite a few in the museums and a lot still flying, see link
http://www.abpic.co.uk/search.php?q=Aus ... OP9&u=type
Funny enough I remember seeing one parked UNDER the wing of one of the Storch's at Duxford a few years ago when I was getting photos for my own Storch so it looked quite diminutive alongside it.
0 -
Didn't seem to make much difference (on the ground), so it hasn't done any harm either!
The hole is for automatic balance of the mixture control for changes in air pressure, so it may be a "good thing", but until I fly it I won't know.
The idea is that for a set fuel mix to which the carb has been set, no further adjustment should be necessary to the mixture controls, and the engine should run reliably whatever the current air pressure, as changes in air pressure (like if you fly up high it will change) are automatically compensated for by the very thin diaphragm inside the "dome" which can press in and out if pressure rises or falls and which opens and closes a very small valve as pressure changes, which balances the mixture as required. I believe the idea is to match the intake of the pressure balancer as near the engine carb intake as possible, so that they both "see" the same air pressure under all conditions and air flow.
Boat and car engine versions don't have this balancer system, as of course they are usually at ground level all the time (and therefore the same air pressure), and the dome and diaphragm are replaced by just a priming bulb.
0 -
Knicker elastic?
OK, after correcting the partial blockage to the pressure hole for pumping fuel (covered partly about a third by ill fitting gasket), and reversing the mixture balance hole to be near the intake, had another go at the engine this morning - Result - SUCCESS. Now able to get full rpm at full throttle. High mixture no problem, will tach it after some running in and set it just rich of maximum revs at 300 or 400 rpm lower perhaps. It's chonking along about 8000 rpm I think, as it blew the hand tach out of my hand so it's pulling well!
I think it was not getting enough fuel at full power because of not enough pressure and vacuum to feed carb at high revs, because of the partial blockage by the gasket.
Will have to paint mark up the prop a bit to get an accurate reading.
Low idle is a different cup of tea, VERY sensitive, and about 1/8th turn each way can make a lot of difference to both idle and transition up to full power. Now starts easily with a new starter anyway, so will carry on some running in and tweak till I'm happy it won't quit.
The mixture balance hole on the carb is nearest the standard intake now, so that may have helped. It's only about an inch from the intake. If Jimbo can fit a tube it may/may not make much difference to running I think, but will take Joes word that it will. The mod would be necessary with the long high performance trumpet intake probably, whether it will help here I'm not certain but it won't hurt to do it!.
0 -
If you are going to club night Jim. I'll bring it along (you owe my a plug anyway)
0 -
The plate is thin pressed steel (I think) and flattened dome shape and the hole is on the side of the dome, so its not a straight flush mount to use the existing hole. You would have to block this, and fit a nipple in towards the center. However a nipple would protrude through and that would impinge (big word) on the diaphragm which is very delicate -not a good idea IMO.
Joe would be correct is thinking brazing on a copper tube is the best solution, and I will carry out the mod when I have time, as I have seen this recommended elsewhere for best mixture control, but the following may have a more significant bearing on the matter.
I checked all my gaskets for fit, and found that the engine to carb bend gasket was not precisely lined up to the pressure hole, and that at least a third of the hole was covered up, (probably the carb bend hole had not been drilled precisely enough) so I have opened up the gasket hole so that it gets full pressure through, as the symptoms do sound like fuel starvation at full chat as rpm rose smoothly from idle up to half throttle, but above that the engine slowed up and stopped, unless you reduced throttle again. If the hole was partially blocked, it maybe wasn't getting enough pressure through to feed the carb at high rpm. The engine wasn't hot, and not seized (plenty of oil content) so it has to be mixture.
We shall see, next time I start her up, whether that has improved matters.
0 -
No probs Joe. Take some time off from modeling, it's what I did for a time -actually it was rather a very long time off for me
 Real life got in the way.
But you do come back with renewed interest, enthusiasm does wax and wane. The problem is, once you get stuck into a new model/s, I tend to ignore everything else till it's done, and that isn't good.
I told myself not to get so involved, and if other chores or family commitments come up, do those, and not get so frustrated at not finishing a particular modeling project, until good and ready to.
The other thing to consider is good health - it's the most important of all, and I personally have had a nasty health problem recently (cancer), that really made me think where my priorities lay, and modeling isn't it - health first, family next and modeling a long way down the list. Take it easier, you can start again when you feel you are ready to.
0 -
The reason for this is that the carb has a diaphragm that must have equal air pressure to the air intake on the carb itself.What you have done by adding a this arrangement to the carb has unbalanced the diaphragm air pressure(and yes the carb is that sensitive).
To resolve the situation you have 2 options.Firstly you can remove all articles and the problem will be solved.Secondly you will see a small hole in the back of the diaphragm case,if you remove the case plate from the carb leaving the Diaphragm inside you can then braze with a small brazing torch a copper tube as you would find in a standard glow fuel tank to the hole in the diaphragm plate.Once done,run a small piece of tygon petrol tube up to the opening (to the side of)of the carb trumpet and,keep in place with cable ties.
The carb will now be balanced and operate correctly but will still be very top end sensitive due to the new mixture of air 2 fuel,you will find you will need to run the top end on a leaner setting than specified.
Hope that all makes sense and is of help 2 you!!!!!!

The diaphragm balance hole on the plate (which is right at the side of the plate-not in the middle) was facing towards the front of the aircraft (in the prop wash), I have now rotated the plate only (it is perfectly rectangular) with the hole now at the rear away from the prop wash and in line with the trumpet, and drawing air from the same area. Maybe that will work, problem is, as my son has left home now, I used to use his small brazing torch, so it means buying another kit to do it, unless some kind soul offers
The other problem is if it is that sensitive, then it would change with the cowl on, as it is only possible to fiddle the mixture screws with it off !0 -
OK, have carb bend and standard intake trumpet fitted to Zenoah 26,, but engine set up is giving me some problems.
Don't seem to be able to flick start it like I do my glo engines, (not fast enough flick -no doubt- the prop is set to pass the sensor magnet when flicking) but it starts on a starter motor fine, that is, when my tired old Sullivan which is yonks old occasionally will it turn it over to start it up (This is a magneto ignition not electronic). Have ordered up a new dynatron starter which should cope with the compression better and an aluminum spinner for easier starting.
When it does start, idle is ok, but cuts when I go up to full rpms anything above the half throttle position on the butterfly. Dunno if this is too rich, or too lean. Have tried a 1/4 turn each way without effect on High jet. However, idle jet also seems to effect the top end also. Once I have the new bits in, will need an experienced gasser man to help me sort it probably. Any takers?
0 -
YT Edge 540
in ARTF
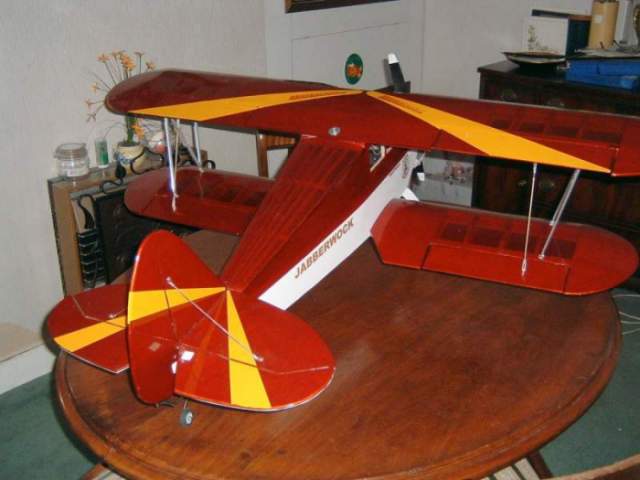
After my Jabberwock completed -something easier to build - ARTF Edge
Engine just checked - needs some tweaking yet (Zenoah 26), and the tail feathers tend to rumba a bit at idle, so going to brace the tail (hard points are provided for it already), re-balance the prop, and finally it's a bit noisy with a custom exhaust, so may try and baffle it up a bit. Will keep me busy for a day or two.
picture attached ( I hope)
0 -
Terry,
I've used fuel dots in the fuselage side for the filler, this sort of thing but can't remember where I got them from.
http://centralhobbies.com/Fuel/fuel_fittings/tetdots.html
The vent just hangs out in the breeze out the bottom of the cowl. Remember to plug it after use as a dribble of petrol in the car really stinks
Thanks Darren,
OK those fuel dots look neat, smaller than the BIG ones Ashtek Electronics are offering, though their petrol filler kit with pump looks good. Yes, it was the vent I was wondering about, I'll just route it out the bottom just behind the cowl to hang in the breeze. I'll have a shop around, Ashtek Electronics do some fuel dots but look huge, though I like the look of their gas tank and hand pump kit.
My DC3 has a Dubro Glow Fuel filler, where the fuel filler just plugs in, and seals when you pull it out, I "think" they do a gasoline one as well. I'll have a look around, long way to go yet, still working on cowl,engine, and carb arrangement.
Cowl on the YT Edge needs shoehorning on, but OK once it's past the "wide" point as the fuz narrows all the way from there onwards to the tail.
The venturi for the carb may have to stick out the side of the cowl, even with a carb bend, don't think it will fit otherwise, unless I don't fit the venturi, and use shorter carb bolts, when it will be completely enclosed.
That may give uneven running or slight reduction of rpm though I notice the MVVS doesn't have the venturi on the carb. However the carb on the Z26 is side facing not frontal as on the MVVS. Glen Models (Zenoah Agent) says just stick the venturi out the side of the cowl, it'll work better even if not so pretty. Any thoughts?
The Z26 engine goes in with the top part of the head and plug peeping out the bottom front of the cowl.
0 -
Although no stranger to fairly big aircraft, I got an Edge from YT recently over Christmas (was persuaded by the special offer price), and bit the bullet and purchased a Zenoah 26 (Magneto ignition) Petrol engine for it, which other than 2 petrol helicopters I've owned in the past, is my first aircraft gasser.
Started fitting it out, sorting the cowl and engine fitting, which is proceeding fairly well, cutting apertures to clear the Cyl head, plug, and a hole for the carb venturi - ( will get a better in-cowl silencer than the standard one supplied from Just Engines), the only thing I would like advice on, is the tank plumbing arrangements. I know I don't need pressure as on glow engines 'cos the carb is pumped, but presumably I will need a vent and fill pipe. What fittings do you petrol heads use to and from the tank, and the arrangement for fill and vent pipes?
0 -
I hope to see her at the field soon for a test flight. Nothing better than bashing balsa, who needs ARTF.
I usually fly at Roundshaw - and although I was an old (make that very old) CAMFC member - I've only just re-joined the club - so haven't got a gate key yet (or even received a new membership card). As it has spats, I need the grass a bit shorter too !!
0 -
Looks like a really nice finish Terry and a really quick build. Have you flown it yet? What are they like to fly?
I have an almost identical old one which is now very tatty after many minor repairs after 4 seasons. I didn't fancy stripping the old one of the covering which is a lot of hard work, but preferred to knock up a brand new shiny one, and I like building - I'm retired so have spare time - very therapeutic.
The old one flies superbly, though the tail is slightly offset to the right after a repair, where is was knocked off on a ground loop, (fortunately just gives extra right thrust) hence new one has tail braces. I'm hoping this one will be even better. It will prop hang but as my servos are standard rather than high torque, normal aerobatics are all I do with it - it knife edges beautifully, not surprising with all that side area and big rudder.
The old airframe will be offered up for auction or given a good home once this one has been maiden-ed.
0 -
Just from the Don Stothers plan - no kits exist any longer, plan still available from Traplet publications though.
There is a smaller version than this, a Giant version 65", and a gi-normous version also at 80" It happens this one can go in my car reasonably easily with wings removed still joined by cabane struts, so rigging is only a minute or two.
Very good for Floats off water too, hard points for mounting floats are incorporated.
0 -
Rear view -tail plane braced - sprung tail wheel
 0
0
C47 (awaiting maiden)
in Gallery
Posted
It's still mothballed at the moment, I have to sort the engine throttle connections and mix, which going to be fun threadling new control runs. Maybe get round to it when the weather is more consistent. Just too many other things to do at the moment, trying to finish the old Veron Hawker Tomtit at the moment. Have got the radio and struts to fit yet, but getting there. Bit rough on finish, as it was done too hurriedly but I expect it will fly ok.